GigOBot - What is it & How to Use it
What is Gig-O-Bot?
Gig-o-Bot is Omni's automated help-center GBA that answers questions and can direct you to particular Omnipedia Articles for more information. Think of them as a computerized chatbot providing answers or directing you to the proper ticket escalation route if they can't help.
Gig-O-Bot 2.0 Tickets
Gig-O-Bot 2.0 Tickets are best used for:
- Earning Questions or Issues
- DESD/IT Support; unable to access tools
- Time Adjustment or Scheduling Support
- Digital Learning or Certification Questions
- Questions about Attendance
- Questions about Certification Extensions
- Technical issues with a Certification Module
- Signing Up for a New Gig
- Questions about Attendance
- Questions about Certification Extensions
- Technical issues with a Certification Module
Creating Tickets with Gig-O-Bot 2.0
1. Open Gig-O-Bot 2.0
You can visit Gig-O-Bot 2.0 in Microsoft Teams, which is identifiable by its chat icon:
- Need Instructions on how to Access Gig-O-Bot 2.0? Click Here
- Can't get into Microsoft Teams to interact with Gig-O-Bot 2.0? We have Gig-O-Bot Lite Here
2. Select the Option You Need Help With
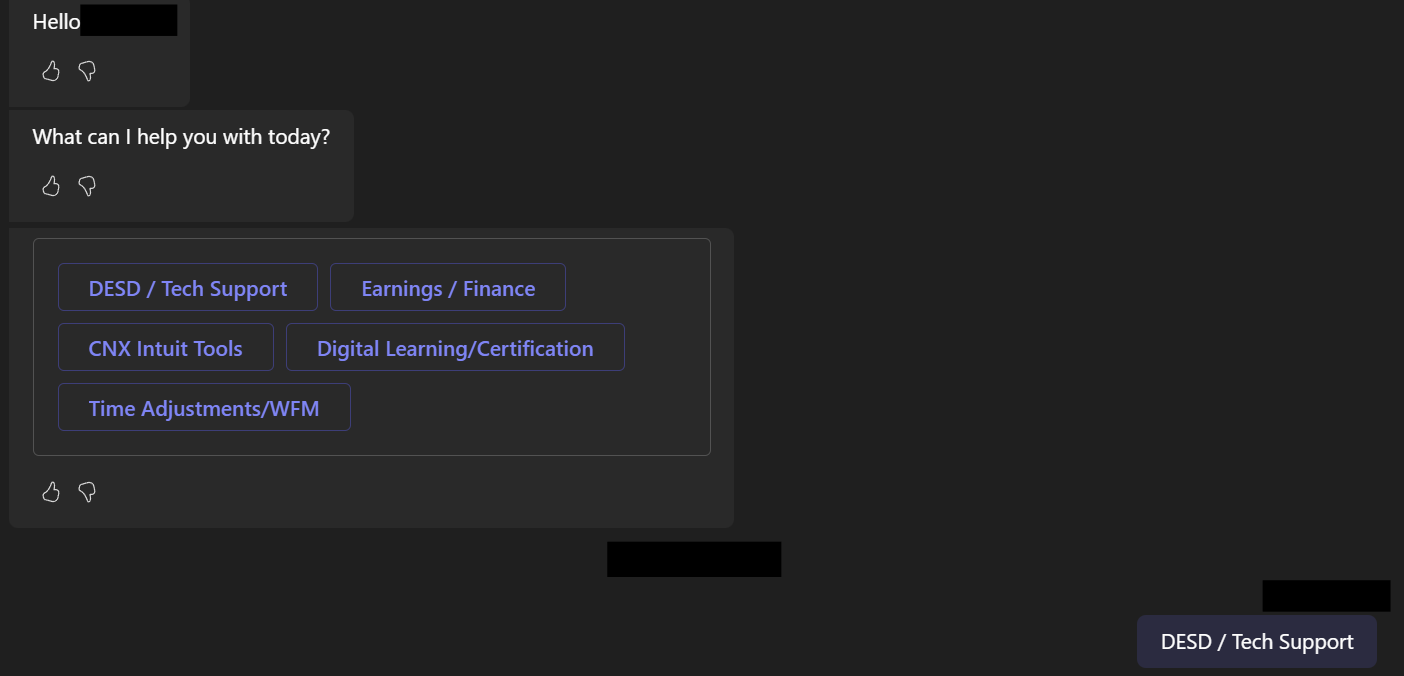
After opening Gig-O-Bot 2.0's chat, you will notice it will ask what it can help you with today. You will choose the option most commonly associated with your situation. For this example, we've selected the 'DESD / Tech Support' option.

3. Select the issue you have
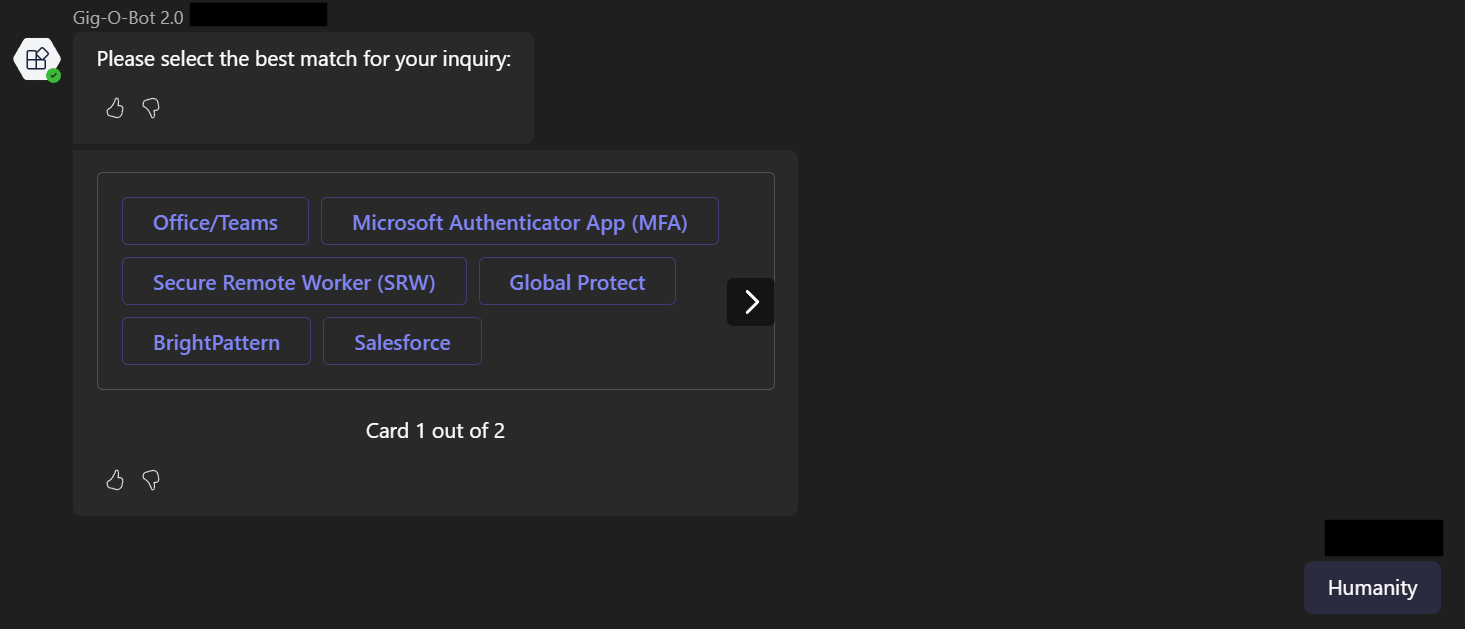
After selecting the DESD / Tech Support option, Gig-O-Bot 2.0 will prompt you to choose the best option for your issue. For this example, we've selected the 'Humanity' option.

4. Read the Omnipedia Article
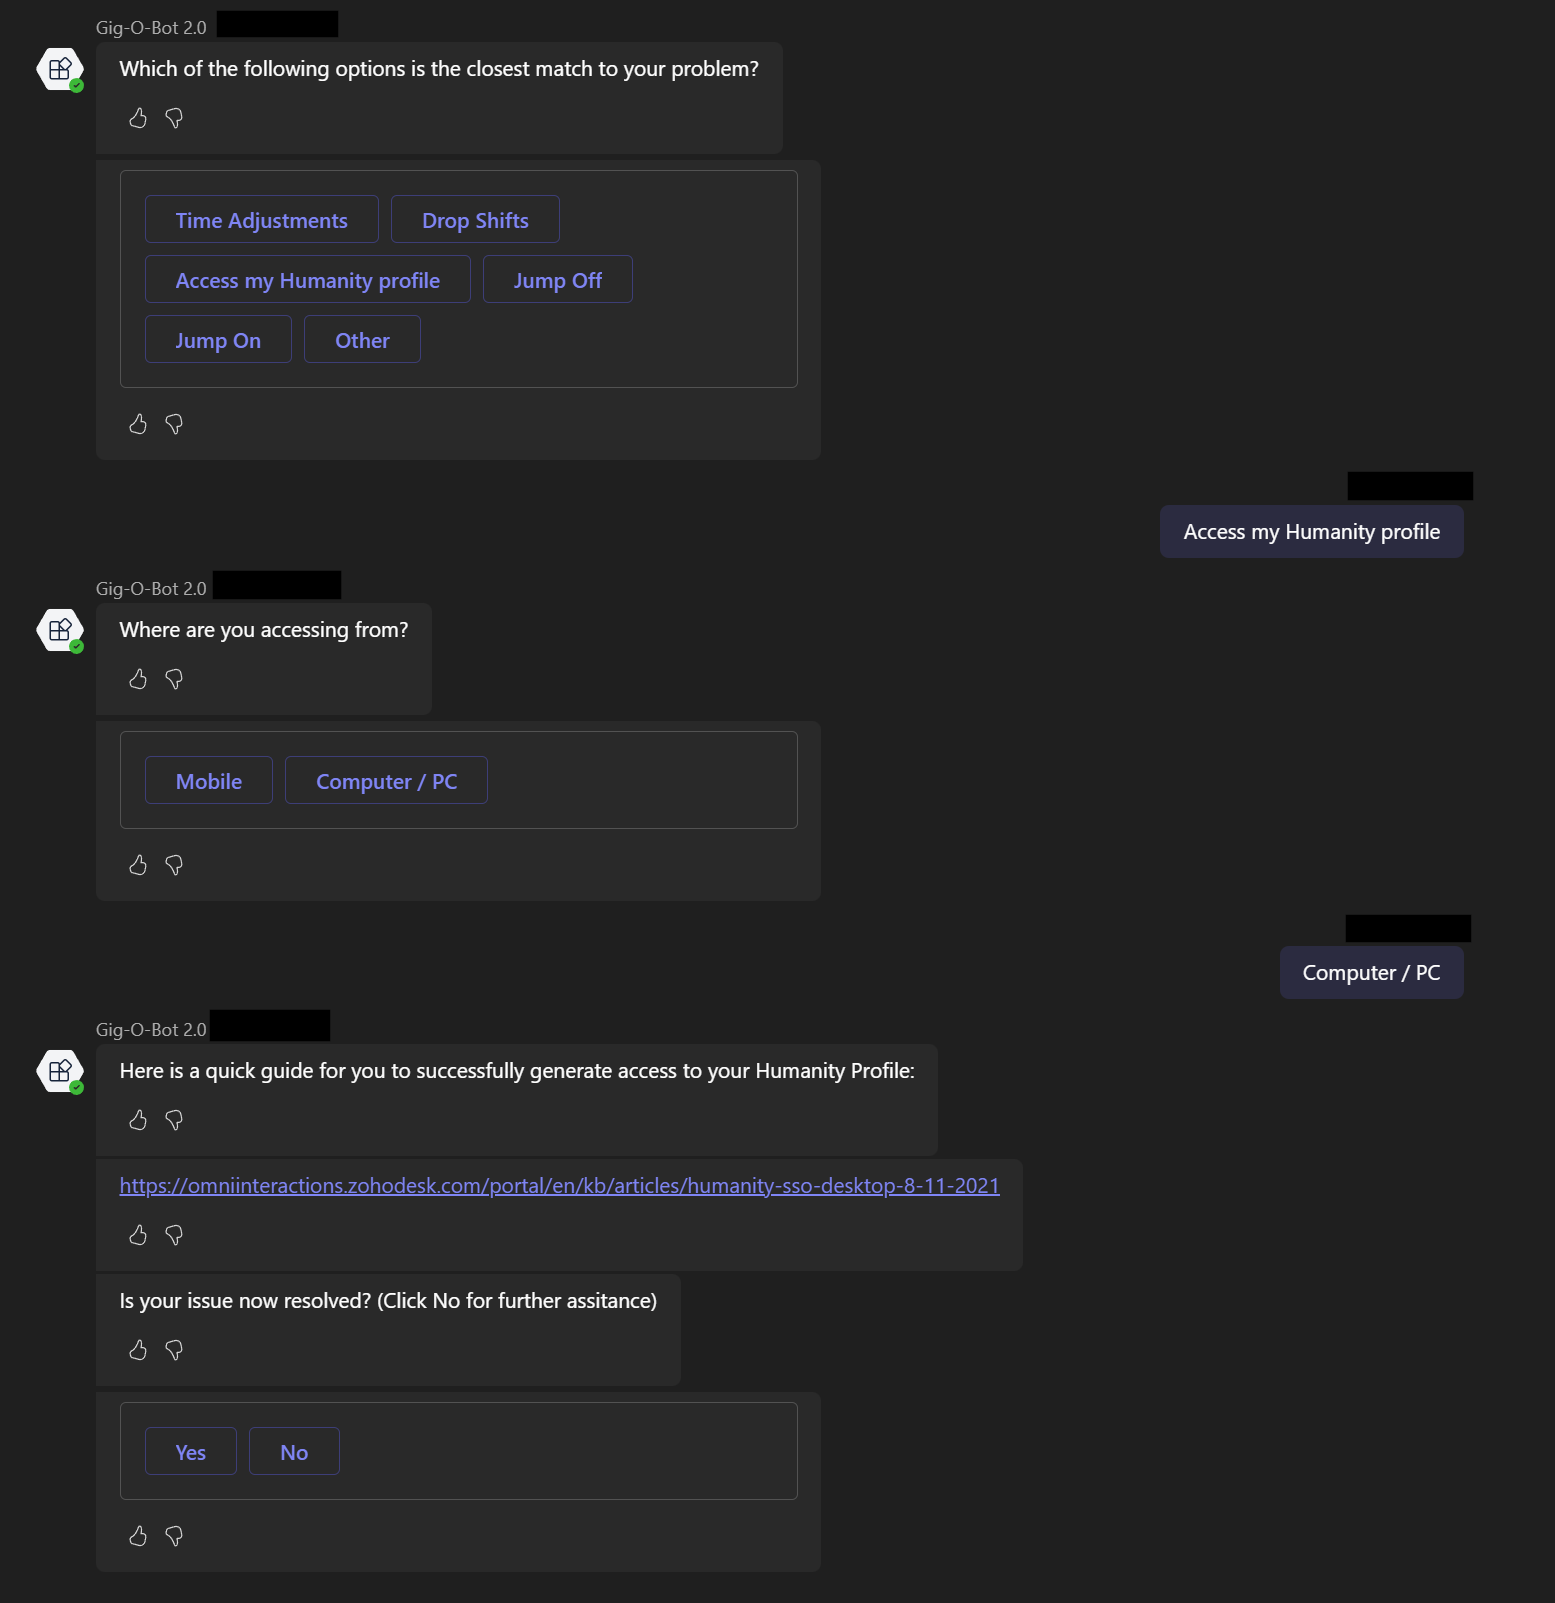
Gig-O-Bot will do its best to show you the Omnipedia Article that is associated with your concern. Click the link in the chat box to open the article in a new tab and review the information for possible resolutions to your question.

5. Create a Ticket if Needed
If the Article Gig-O-Bot 2.0 provided to you did not answer your question, then you can select the No option to create a Ticket for your concern.
Important Information
What you need to know about Gig-O-Bot Requests:
Your Gig-O-Bot ticket request will be sent to the department's direct Omni Inbox. To receive a resolution as soon as possible, please use the information below when reviewing your Gig-O-Bot Requests:
Your Gig-O-Bot ticket request will be sent to the department's direct Omni Inbox. To receive a resolution as soon as possible, please use the information below when reviewing your Gig-O-Bot Requests:
1. ONE Request:
Our Omni Departments work to provide the most efficient resolutions or answers to GBAs. Please send only one request at a time within 48-72 business hours. If your request has not received a resolution or answer within 72 business hours, please check your ORIGINAL Gig-o-bot request first. DO NOT create additional Gig-o-Bot chats or requests about the same issue or concern, as this will further delay receiving a response or resolution.
Our Omni Departments work to provide the most efficient resolutions or answers to GBAs. Please send only one request at a time within 48-72 business hours. If your request has not received a resolution or answer within 72 business hours, please check your ORIGINAL Gig-o-bot request first. DO NOT create additional Gig-o-Bot chats or requests about the same issue or concern, as this will further delay receiving a response or resolution.
2. Check Your Request Status
If it has been 48-72 hours, please check the status of your request ticket first, as a resolution or answer may have already been provided. If you need assistance checking the status of your request, you can CLICK HERE to view the Omnipedia Article on checking ticket status.
If it has been 48-72 hours, please check the status of your request ticket first, as a resolution or answer may have already been provided. If you need assistance checking the status of your request, you can CLICK HERE to view the Omnipedia Article on checking ticket status.
3. Respond within the Original Request
If it has been 48-72 hours and you have already checked your request status and it is still showing as open, please send a message to your ORIGINAL Request to request updated information. DO NOT create additional requests for the same issue or concern, as this will further delay receiving a response from our Omni Departments.
If it has been 48-72 hours and you have already checked your request status and it is still showing as open, please send a message to your ORIGINAL Request to request updated information. DO NOT create additional requests for the same issue or concern, as this will further delay receiving a response from our Omni Departments.
What are Tickets?
Omni has multiple communication methods available to support you during your business collaboration! One of these communication methods is called Tickets. Omni Strongly recommends using Tickets to collect precise information from you to better support your business. Tickets can be created in the following ways:
- Gig-O-Bot 2.0 (Instructions)
- Gig-O-Bot Lite
- Direct Ticket Requests
- Emailing one of Omni's Support Departments
This article provides directions for completing Tickets using these three methods and explains which option is best to use during Ticket creation.
Gig-O-Bot Tickets
Gig-O-Bot Tickets are best used for:
- Earning Questions or Issues
- DESD/IT Support; unable to access tools
- Time Adjustment or Scheduling Support
- Digital Learning or Certification Questions
- Questions about Attendance
- Questions about Certification Extensions
- Technical issues with a Certification Module
- Signing Up for a New Gig
Direct Ticket Requests
Direct Ticket Requests are Best used when:
- You've read all relevant Omnipedia Articles about your issue
- You've entered all information into Gig-O-Bot 2.0
- You only need to send one request
Sending Direct Ticket Requests
1. Visit Omnipedia
Click on the link above or go to the web address: https://omniinteractions.zohodesk.com/portal/en/home to visit the Omnipedia Home Page. Please Note: You must be signed into Omnipedia to send in a direct ticket. For instructions on signing into Omnipedia, please Click Here.2. Click the "+" sign
Click on the plus sign and then select "Submit a Ticket"3. Select the Appropriate Group
Click the "Submit Ticket" option under the best Group for your direct requests. Please note, depending on the Gig that you are on, you will see an option to send in a Ticket directly to that Group.4. Fill out the Form
After the Submit a Ticket Form opens for the Group you've selected, please complete all required fields and provide accurate details about your issue.As a reminder:- Name - Full Name you joined Omni with.
- Email - Is your OMNI GBA EMAIL
- Phone Number - The best phone number to reach you
- Your Role - Your current role; i.e., [Client Name] GBA
5. Provide Details and/or Attachments
Provide as many details as possible using the bullet points option and attaching relevant files or screenshots that will assist the Group in resolving your issue.6. Mandatory Fields
You MUST complete all mandatory fields before your direct ticket request can be sent. Mandatory fields are marked with an asterisk (*) before the section title.7. Check for Updates
Once you have submitted your ticket, you can find updates in the Tickets section of Omnipedia.- If you would like to view detailed instructions on how to check your Ticket status, Click Here to view the Omnipedia Article.
8. Closing or Closed Tickets
Once your ticket has been updated and you have been assisted, it will be marked as 'Closed'. If you were able to find the answer on your own and no longer need the ticket request, you can close the ticket yourself by clicking "Close Ticket."Email Ticket Requests
Email Ticket Requests are Best Used When:
- You need to contact the Omni Support Department
- Gig-Talent: You'd like to sign up for a new Gig, but Gig-o-Bot does not work
- Client Services: You have questions about contract requirements
- Verifications: When you need to verify your business collaboration with Omni
- Schedules: When you need to schedule time off, and it is below the 48-hour grace period to release through Gig-O-Bot
How To Send Email Ticket Requests:
1. Read Omnipedia First
Read all relevant Omnipedia Articles about your issue before sending an email or placing a ticket.- Gig-O-Bot & Omnipedia should be your first stop when requesting assistance.
2. Enter Accurate Information
Enter all information into Gig-O-Bot, your Ticket Request, or Email Request as accurately as possible. If there are errors in the information, it can delay your resolution.3. ONE Ticket or ONE Email ONLY
Only submit 1 ticket or send 1 email; if more than 1 ticket or email is submitted, it will delay your resolution response from the proper department.4. Directory List for Emails
If your credentials are deactivated and you are unable to submit a ticket, please visit https://omniinteractions.zohodesk.com/portal/en/kb/articles/omni-contact-information or click on the "Directory List for Emails" Link to view the Omni email directory.Important Information
What you need to know about Requests:
The contact information will go to the direct Omni Inbox for the department. To receive a resolution as soon as possible, please use the information below when sending in your email requests:- Subject: 4-5 Word Title for Assistance Request. i.e., Earnings Question Regarding...
- Description: Please make this as accurately detailed as possible to receive the fastest resolution. You may even attach files, screenshots, or photos related to your request.
- ONE Request: Our Omni Departments work to provide the best efficient resolutions or answers to GBAs, please only send one request at a time within 48-72 business hours. If your request has not received a resolution or answer within 72 business hours, reply to your ORIGINAL email request or ORIGINAL ticket request asking for updated information. DO NOT create additional requests about the same issue or concern as this will delay receive a response or resolution further.
- You've read all relevant Omnipedia Articles about your issue
Related Articles
GigOBot - What is it & How to Use it
What is Gig-O-Bot? Gig-o-Bot is Omni's automated help-center GBA that answers questions and can direct you to particular Omnipedia Articles for more information. Think of them as a computerized chatbot providing answers or directing you to the proper ...GigOBot - What is it & How to Use it
What is Gig-O-Bot? Gig-o-Bot is Omni's automated help-center GBA that answers questions and can direct you to particular Omnipedia Articles for more information. Think of them as a computerized chatbot providing answers or directing you to the proper ...How to Use Omnipedia
Omnipedia In this article, you will find information on Omnipedia, Omni's Online Knowledge Base, with instructions on how to use it. Review the information below as needed. What is Omnipedia? Simply put, Omnipedia is Omni's online Knowledge Base. It ...Installs & Access - Using Omnipedia
In this article, you will find instructions on how to use Omnipedia, Omni's Knowledge Base. Instructions Self Help Portal and Knowledge Base What is it? Put simply, this Knowledge Base is an online library of information or guides about topics, ...Tickets - What Are They & When to Use Them
In this article, you will learn what tickets are, how to submit tickets, and when to submit tickets. What are Tickets? Omni has multiple communication methods available to support you during your business collaboration! Omni strongly recommends the ...